Note:
This functionality is currently only supported in Map Viewer Classic (formerly known as Map Viewer). It will be available in a future release of the new Map Viewer.
 The Create Buffers tool creates areas around input point, line, or area features to a specified distance.
Workflow diagram

Analysis using GeoAnalytics Tools
Analysis using GeoAnalytics Tools is run using distributed processing across multiple ArcGIS GeoAnalytics Server machines and cores. GeoAnalytics Tools and standard feature analysis tools in ArcGIS Enterprise have different parameters and capabilities. To learn more about these differences, see Feature analysis tool differences.
Terminology
| Term | Description |
|---|---|
Geodesic | Refers to a line drawn on a sphere. A geodesic line drawn on the globe represents the curvature of the earth's geoid. |
Planar | A straight-line distance as measured on a flat surface (that is, a Cartesian plane). This is also referred to as Euclidean distance. |
Map projection | Uses mathematical formulas to relate spherical coordinates on the globe to flat, planar coordinates. See About map projections for more details. |
Multipart | A feature that has more than one part with one set of attributes. In a layer of states, for example, the state of Hawaii could be considered a multipart feature because its separate geometric parts are classified as a single state. |
Examples
The following are example uses of the tool:
A city council has noticed a high number of liquor stores per capita in the city. In an effort to keep liquor out of the hands of children, the council decides to place regulations on advertising in liquor stores within 1,000 feet of schools, parks, and libraries. The council also wants to restrict new liquor licenses to buildings that are more than 1,000 feet from schools, parks, and libraries.
A development company is looking to make money by creating a new mixed-use development in an urban center. The development will have to be conveniently located within a quarter mile of shops, restaurants, or a light rail stop.
Usage notes
The size of the buffer can be entered using one of the following three options:
- Distance—Uses a constant value (all buffers will be the same size)
- Field—Uses values from a field (different features can have different-sized buffers)
- Expression—Applies an expression to each feature (different features can have different values based on expression)
Learn more about applying buffer expressions
By default, the Create Buffers tool creates overlapping buffers when the buffer areas meet. When the input features are areas, the input area is included in the buffer. You can use the dissolve and multipart parameters to control how overlapping buffers are treated. The three available dissolve options are as follows:
- None—This is the default. Buffers will overlap where buffer areas meet.
- All—All of the features are dissolved. The multipart parameter determines if all features are dissolved into one feature (multipart is true), or only overlapping features are dissolved (multipart is false).
- Fields—Features are dissolved based on field values. You can select one or many fields, and like values are dissolved together. The multipart parameter determines if all matching field features are dissolved into one feature (multipart is true), or only overlapping matching field features are dissolved (multipart is false).
When you dissolve using All or Fields, you can calculate statistics. The statistics are only applied to dissolving of all features or field values, they are not applied geographically (using the multipart parameter). The following table explains how these options work using the six features shown in the following screen shot. The color denotes the field values (blue or orange), which are used for the field dissolve.
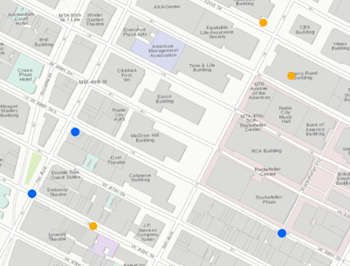
| Dissolve option | Multipart is false (default) | Multipart is true |
|---|---|---|
| None | 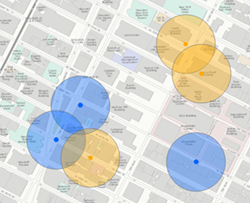 Six features are created when no dissolve is applied to buffered features. This is the default. This is the same as the standard analysis tool's Overlap option. | Multipart cannot be true when the dissolve option is None. |
| All | 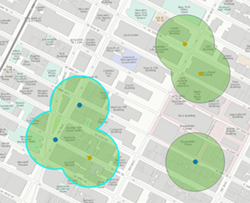 Three features are created when all values are dissolved and multipart is false. Only overlapping features are dissolved. This is the same as the standard analysis tool's Dissolve option. | 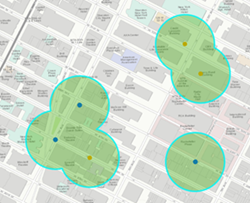 One feature is created when all values are dissolved and multipart is true. When you select this option, the result will always be one feature. |
| Fields | 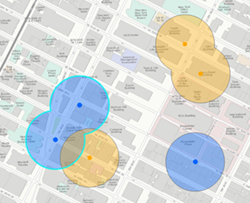 Four features are created when the dissolve is applied based on the field (here, the field is the color of input points). Only overlapping features with the same value of the specified fields are dissolved. | 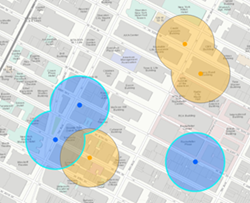 Two features are created when the dissolve is applied based on the field (here, the field is the color of input points) and multiparts are allowed. Values with the same field value will always be a single feature. |
If Use current map extent is checked, only the features that are visible within the current map extent will be analyzed. If it's not checked, all input features in the input layer will be analyzed, even if they are outside the current map extent.
Limitations
If you are using the Distance option or an expression that uses a linear unit, your data must be in a projected coordinate system.
How Create Buffers works
The Create Buffers tool uses a geodesic or planar method for constructing buffers. Geodesic buffers account for the actual shape of the earth (an ellipsoid, or more properly, a geoid). Distances are calculated between two points on a curved surface (the geoid) as opposed to two points on a flat surface (the Cartesian plane). Planar (or Euclidean) buffers are straight-line distances calculated between two points on a plane. Euclidean buffers appear as perfect circles when drawn on a projected flat map, while geodesic buffers appear as perfect circles only on a globe. Geodesic buffers may appear unusual on a flat map, but when displayed on a globe, these buffers will look correct.
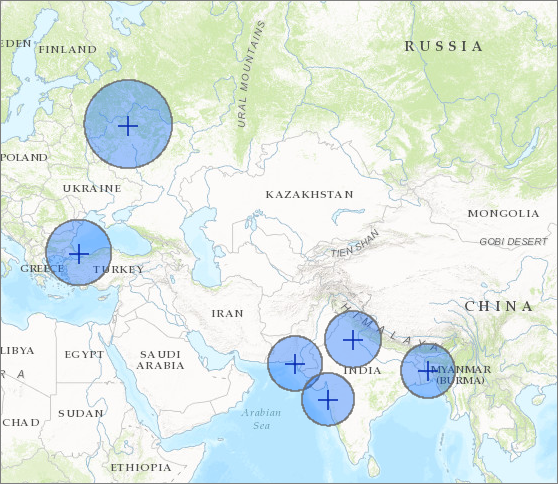
The following example uses a 300-mile buffer around cities with populations of more than 10 million. The buffers closer to the equator appear smaller than the buffers further north because the Web Mercator projection used to display web maps distorts the size of objects relative to the object's distance from the equator.
In most cases it is appropriate to use a geodesic buffer, especially if your data meets the following conditions:
- You expect a buffer to extend past the international date line.
- Your dataset covers multiple UTM zones.
Learn more about using planar and geodesic buffers
Calculations
When layers are dissolved using the All or Fields options, statistics are calculated on the fields. The calculation results are the same if multipart is true or false. There are eight options for numeric statistics (Count,Sum, Minimum, Maximum, Range, Mean, Standard Deviation, and Variance) and two options for string statistics (Count and Any). The count of the number of features dissolved is always calculated.
The count statistic (for strings and numeric fields) counts the number of nonnull values. The count of the following values equals 5: [0, 1, 10, 5, null, 6] = 5. The count of this set of values equals 3: [Primary, Primary, Secondary, null] = 3.
ArcGIS API for Python example
The Create Buffers tool is available through ArcGIS API for Python.
This example buffers all earthquakes by the predicted distance that tremors were felt and dissolves them into one feature.# Import the required ArcGIS API for Python modules
import arcgis
from arcgis.gis import GIS
from arcgis.geoanalytics import use_proximity
# Connect to your ArcGIS Enterprise portal and confirm that GeoAnalytics is supported
portal = GIS("https://myportal.domain.com/portal", "gis_publisher", "my_password", verify_cert=False)
if not portal.geoanalytics.is_supported():
print("Quitting, GeoAnalytics is not supported")
exit(1)
# Find the big data file share dataset you'll use for analysis
search_result = portal.content.search("", "Big Data File Share")
# Look through the search results for a big data file share with the matching name
bdfs_search = next(x for x in search_result if x.title == "bigDataFileShares_NaturalDisaters")
# Look through the big data file share for Earthquakes
earthquakes = next(x for x in bdfs_search.layers if x.properties.name == "Earthquakes")
# Set the tool environment settings
arcgis.env.verbose = True
arcgis.env.defaultAggregations = True
# Run the Create Buffers tool
output = use_proximity.create_buffers(input_layer = earthquakes,
field = "TremorDistance",
method = "Geodesic",
dissolve_option = "All",
output_name = "Earthquake_impacts")
# Visualize the tool results if you are running Python in a Jupyter Notebook
processed_map = portal.map('USA')
processed_map.add_layer(output)
processed_map
Similar tools
Use Create Buffers to create areas around input features. Other tools may be useful in solving similar but slightly different problems.
Map Viewer Classic analysis tools
If you are calculating statistics for a layer within a distance of an input, use the Join Features tool.
If you want to create buffers in areas using the standard analysis tools, use the Create Buffers tool.
ArcGIS Pro analysis tools
The Create Buffers tool is available in ArcGIS Pro.
Create Buffers performs the functions of the Buffer and Dissolve tools.